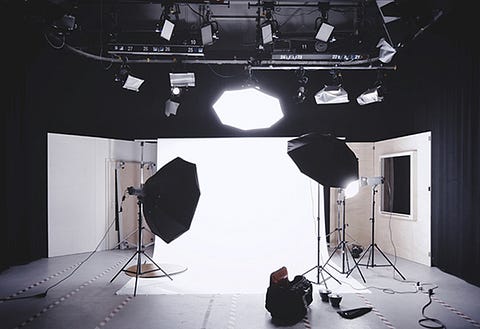
Just as the name suggests, three-point lighting is one of the most popular methods of lighting used in filmmaking, wherein you light the subject from three diverse sources. The primary purpose of using three-point lighting is to have proper control of shadows and to balance the contrast. By altering the distance, intensity, and position of these 3 light sources, it becomes easier to control the light falling on a subject and helps to create different moods.
The SettingJust as the name suggests, three-point lighting is one of the most popular methods of lighting used in filmmaking, wherein you light the subject from three diverse sources. The primary purpose of using three-point lighting is to have proper control of shadows and to balance the contrast. By altering the distance, intensity, and position of these 3 light sources, it becomes easier to control the light falling on a subject and helps to create different moods.

The Key Light
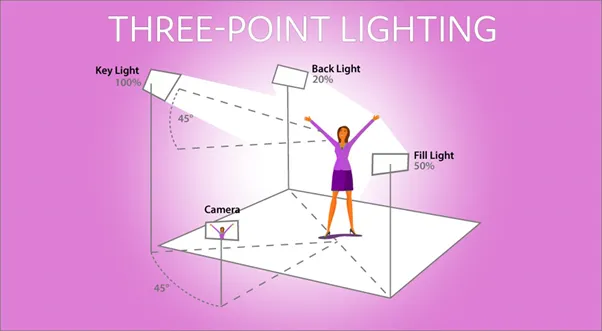
This light is the primary source of lighting in the three-point light setup and also the brightest. It is this light that illuminates the subject and gives the scene its overall exposure. The key light usually represents the most dominant source of light in a particular scene, like the sun, window, or ceiling light.
The Fill Light
A less bright light that is placed opposite to the key light is called the fill light. It’s kept in the opposite to either cancel out or balance the shadows formed by the key light. Also, it is not necessary that the fill light must be an exact source of light, it could also be a reflector, wall, or a bounce card that bounces back some light on the subject.
The Back Light
Popularly known as a rim light, it is placed at the back of the subject and helps in separating the subject from its background. This light creates a nice halo effect around the subject’s head and shoulders and provides a neat outline.
Start with the dark
In order to understand your lighting better, always begin in complete darkness. There should be little or no ambient light so that you can clearly differentiate between your light placements.
Place the key light
The first light that you should place is the key light. Since this makes for the brightest source of light, it should be placed at an angle between 15–45 degrees at the side of the camera for creating a visual that has depth. Also, make sure that your key light is placed on a slightly higher spot than the subject to avoid casting shadows on the face.
Add your fill light
The fill light should be placed opposite to the key light, and to get the best effect it should have half the intensity of the key light. Cinematography experts control the mood of the scene basis how bright or dim they keep the fill light. For example, a dim light would help to create a noir-like shadow of the subject, while a brighter light will give your subject a more even look. The fill light should be kept on the face level of the subject and not higher so that it can even out any shadows formed by the key light.
Bring in the backlight
The backlight should be placed in a way that it is not seen. Usually, cinematographers use high stands with lights positioned downwards to give subjects a clear outline and separate them from their background.
Reference Links:
www.nfi.edu/foley-artist
www.sound-ideas.com/Page/what-is-foley
www.studiobinder.com/blog/what-is-a-foley-artist
www.nfi.edu/foley-artist
www.sound-ideas.com/Page/what-is-foley
www.studiobinder.com/blog/what-is-a-foley-artist

